Your support team is excited to offer another method to contact support for your SOCS site, Live Chat!
In the bottom-right corner of the SOCS Insider page, you will see a "Chat With An Expert" button.
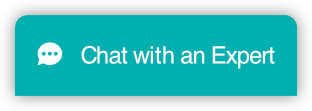
Click that button, fill out the quick form, and start chatting with support.
If you access Chat after hours, or when agents are unavailable, the button will show Contact Us. You can fill out the small form, and a case will be created so we can get back to you.
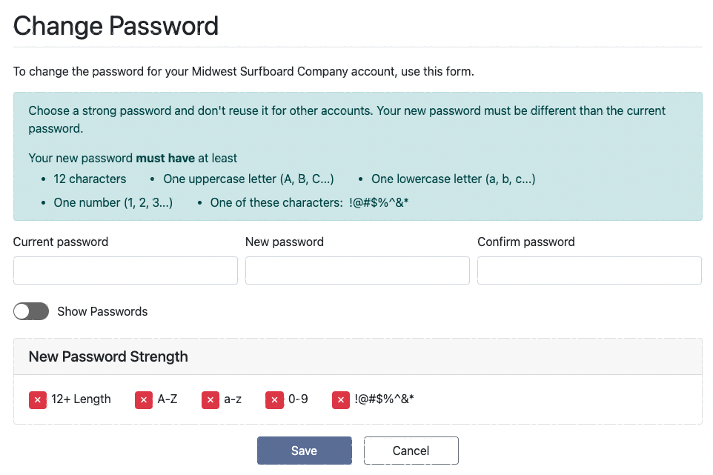
Starting February 15th, SOCS is updating the password complexity requirements to make your site more secure. All users will be given 30 days to update their password to meet these requirements. After 30 days, those who have not updated will have their passwords expired, and will be required to update their password next time they login.
The new password criteria must have:
Adding New Users
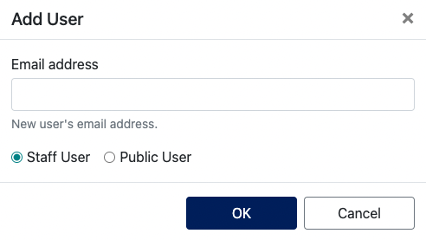
The process of adding new users to your SOCS site will also be updating. The new user’s email address provided by the site admin will receive an email with instructions on how to complete their registration and create their own password.
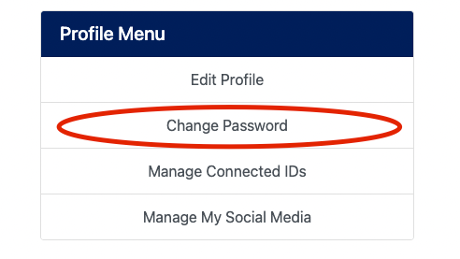
Change Password
Changing your password can now be done under your Profile Menu.
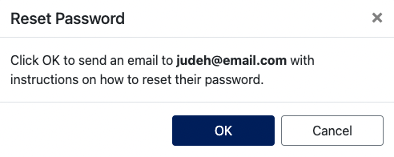
Reset Passwords
Admins can now reset users’ passwords by editing the user and selecting Reset Passwords.

The user will receive an email with instructions to create their new password.
Additional information can be found in our Users Training Guide.
Questions? Contact SOCS Support at 800-850-8397, ext. 3 or socssupport@fes.org!
SOCS is excited to announce additional features and updates to our Notifier!
SOCS Notifier has added the ability to create repeating messages. If you have the same message that needs to go out at different times (e.g., monthly meeting reminders), simply create it once and set the delivery schedule.
On the Send Message screen, click the set up repeating message button in the Message Scheduling section. You’ll then be prompted to choose the start date and time, the end date if applicable and frequency of the repeating Notifier message.
Frequency options include daily, weekly, monthly and yearly:
Messages being duplicated will now display the original text and destinations in the Send Message screen. This allows you to easily see what previous channels and groups received the Notifier message so you can decide whether or not to send to the same or different channels and groups.
To comply with all cellular providers, Notifier text messages will now be limited to 220 characters. If you are sending a Notifier message that is longer than 220 characters, and you choose a text destination, you will receive a warning below the message field indicating the number of characters over the limit and you will not be able to send the message.
Additional information can be found in our Notifier Training Guide. Questions? Contact SOCS Support at 800-850-8397, ext. 3 or socssupport@fes.org!
Check out these exciting enhancements to the SOCS Notifier that provide you with increased options and convenience when sending Notifier messages from your SOCS site and the SOCS GO app!
Scheduling Messages
You can now choose to send your Notifier message to various channels (push, text, email, and/or social media) immediately or schedule it to send at a future date and time. To send a Notifier message right away, choose Send Now and click Send Message. To send a Notifier message at a future date and time, choose Send Later and use the date and time pickers to choose when to send the message. Then, click Send Message.
Easily Select Message Multiple Message Destinations
When sending a Notifier message, all available push, text, email, and social media groups will be listed under Message Destinations. You can now select the check box next to the channel type to choose all groups within that channel to receive your message. Or select the specific groups you want to send your message to.
Manage Messages
A new addition to the Notifier menu is Manage Messages. This page shows you all sent and scheduled messages among the three tabs located above the table.
This table also shows you whether the message is active on the front-page widget and View More listing, the message text, the number of groups the message was sent to within each channel (push, text, email, and social), the time it was sent or is scheduled to send, and the person who created the original message.
Editing Messages
On the Manage Messages page, you can edit any sent or scheduled messages, including altering the message text, notification groups receiving the message, and when the message is sent (if scheduled). It is important to remember that editing a sent message does not resend the Notifier message. Rather, this simply edits the way it appears on the front-page widget and the View More notifier message listing. To edit a message, navigate to either the All, Sent, or Scheduled tab, and click the edit icon to the left of the message in the table.
If you edit a scheduled message, a yellow warning box will appear indicating that the sending is paused for one hour and will be reactivated upon clicking Save or Cancel.
Duplicate Message
You also can duplicate a message. This is a great option for reusing the text of a message you have previously sent. Navigate to the message among either the All or Sent tabs under Notifier, Manage Messages. Click the edit icon to the left of the message in the table, and then, click Duplicate Message. You will see the original message text, along with the various groups the message was originally sent to. You can edit the message text and add or remove groups if necessary and send your message again immediately or in the future.
Additional information can be found in our Notifier Training Guide. Be sure to keep your eyes open for more enhancements to the SOCS Notifier in the future!
You're probably accustomed to contacting the SOCS Support Team if you've ever wanted to make changes to your theme. In the coming months, SOCS will be rolling out changes that will now give you more control of your theme options. While we continue to add more and more theme options, below are a few that you can now take the reins on!
Theme Options is a user privilege that you will need in order to make changes. Once you've been given access, you'll go to Admin, Theme Options to start making changes. NOTE: Depending on your theme, not all options may be available.
App In Stores
Link directly to your organization's App in Stores in the footer of your site. You can customize the Title and Description text or leave it as is. Be sure to include direct links to your app in the Apple App Store and Google Play Store for quick access to your branded app!
Header
Have a video you want to display on your front page Image Rotator? You can quickly switch between displaying images to a video and vice versa! Simply paste in your video URL (ex: YouTube, Vimeo, etc.) and choose additional options, like Autoplay or Loop. If you have a video URL with these additional options already include, paste it in and you're ready to go!
Footer
Want to make it easy for your site visitors to sign up for News Updates or text and/or email notifications? Enable the News Updates and Alerts component and open up more channels of communication between you and your community! NOTE: Please contact SOCS Support if you do not currently have email listservs set up for this function.
General - Scroll To Content
Enabling this feature allows viewers to automatically bypass the image rotator and go straight to the content on the page. Choose between scrolling to content on all pages, front page only, or section/subsection pages.
Navigation Extras
An easier way to toggle the availability of extra links in your navigation bar. You can now enable links to other SOCS components, such as Parent Teacher Conference, and customize the text for each link.
Notifier
An easier way to customize how notifications display on your front-page widget and View More page.
We are continuing to work on a long list of additional theme options that will be added to this new enhancement, including managing addresses in the footer, masthead buttons, and social media links and displays. Be on the lookout for more exciting additions, and feel free to reach out to SOCS Support via email (socssupport@filamentservices.org) or phone (800-850-8397 ext. 3) anytime -- we're here to help!
Spotlights provides you with a quick and easy way to showcase your students, staff, community, special events and so much more. You can place Spotlights on the front page or on any section and/or sub-section. The location of the Spotlights depends on your SOCS theme.
How do I get started?
Spotlights is a new access level you need to assign to your Users. Select Admin, Users then search for the user whom you want to be able to add Spotlights to your site. Check the box next to Spotlights, then Update User, and they're ready to get started!
How do I add Spotlights?
Check out our Spotlights Training Guide for step by step instructions! Have Questions? Give us a call and we would be happy to walk you through adding your Spotlights!
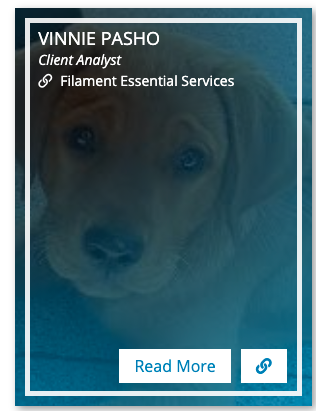
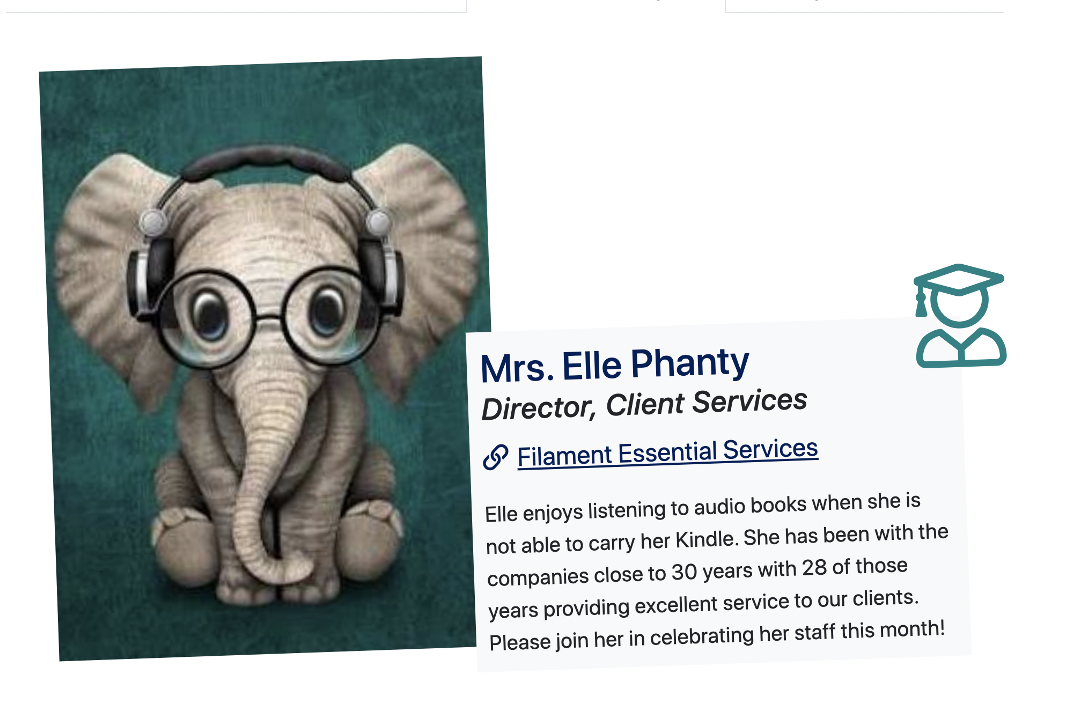
What does a Spotlight look like?
A Spotlight contains a name and description of the content you are spotlighting. Images uploaded have fields that can be customized for the type of image added. If you are celebrating people, use the person's name, title and a description of the person. If you are highlighting a class art project, use the Title as the name of the art piece and the Description for describing the art piece.
Hover over an image to see the Animation Style. There are six to choose from!
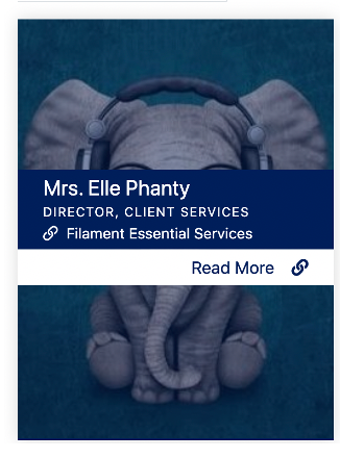
The Read More link takes you to the detail page. For our example, we picked the Slanted with Icons Detail Page Style to add a bit of bling to our spotlight!
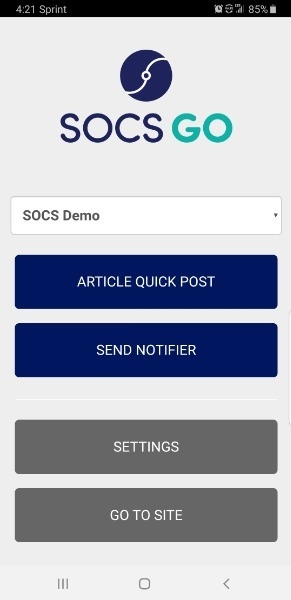
The SOCS GO App is free and available for you to download from the Apple and Android stores.
It’s easy to get started once you have downloaded the App. Enter your SOCS Site URL (SOCSURL.socs.net) and use your existing credentials to login. Now you and your staff can quickly post to the site as your permissions allow.
This is the perfect way to grab that photo of the winning one-act cast receiving their award and have in on your SOCS site with a bit of copy before they get back to their seats. As always, you can go to any article on the site and send to social media channels with a click.
SOCS strives to provide you with frequent enhancements to your SOCS experience, almost always at no additional cost, while keeping the annual cost stable.
You and your team are always welcome to call or email SOCS Support with questions.
Download the App


Now you can post videos to article media galleries straight from your phone or mobile device using the SOCS GO App! It's a great way to quickly document some of your school or organization's exciting moments straight from your phone to your SOCS website right as they happen, and now you can showcase them with photos or videos!
Once you've taken a short video using your mobile device, you can share or upload the video to the SOCS GO App and post it using the Article Quick Post feature. After downloading the SOCS GO app, you can upload the video to your article quick post in two different ways:
Sharing from your mobile device's photo library
Simply go to your mobile device's photo library, and select your video. You can select up to 25 photos or videos to feature in your Quick Post's Media Gallery. Once you've selected the desired photo(s) and/or video(s), choose your mobile device's Share icon and select SOCS GO from the options provided. This will automatically open the SOCS GO app and start a Article Quick Post with your media uploaded to the article's media gallery. Be sure to add alt text (images) or a closed captioning file (videos) for accessibility purposes. You can then proceed with your Article Quick Post as you normally would; adding a headline, content, assigning it to a section, and even featuring it on the home page or sharing via the Notifier.
Uploading directly from the Article Quick Post
Once you've opened the SOCS GO app, click Article Quick Post. You must first enter a headline for your quick post before you can add media to the galleries. Once you've done that, click Add Media, then Upload. Depending on your device, you can either take a photo or video (which will open your device's camera), or choose a photo or video from your device's photo library. Once you've selected your desired photo(s) or video(s), click Start Upload. You can then add a caption, photo/video credits, and alt text or a closed captioning (CC) file for accessibility purposes. You can then proceed as your normally would, adding any content, choosing a section, and posting the Quick Post on the home page or sharing it via the Notifier.
If you haven't already, be sure to download the SOCS GO App, which can be found in either the Apple App Store or Google Play Store by searching "SOCS GO."